The Meridian 45B
By N. Dhananjay for the Large Format Page
The press/technical camera is a superbly crafted piece of engineering. What unites these cameras is the fact that they are usually made of metal (quite rugged) and fold into a compact box. The entire front standard slides into the body, and the hinged bed can be swung up to close the box. The basic design was pretty much set around the middle of the century and the archetypal brands were Graflex and Linhof. It's a tribute to their design that these cameras are still quite sought after and still deliver yeoman service in use. These cameras now enjoy a resurgence among field photographers looking for lightweight and rugged field kits.
The most ubiquitous of these cameras are the Graphics. These are meant primarily as press cameras, which is very obviously reflected in their design. They have some limited front movements and no back movements. The better ones will have a revolving graflok back, which allows a variety of accessories like grafmatics and roll film backs. They offer multiple focussing arrangements - hoop viewfinders, distance scales, rangefinders and ground glass focussing. Everything about the classic Graphic design is geared towards a press photographer from a bygone era and these really are the cameras left homeless by the newspapers' move to newer printing methods, which made lower demands on photographic quality and cleared the way for their smaller, lighter 35mm brethren.
Many Graphics are well suited for field photography. A Speed Graphic with a focal plane shutter will allow you to use cheaper barrel lenses. The front movements are often more than adequate for most field work (this is especially true of the Super Graphics). For more information about Graphic cameras, click here . For information on Super Graphics, click here and here. These are extremely nice designs and to own one is to own a bit of history. You can see where the Toyo fields got started. Other cameras based on a similar design idea are the Busch Pressman, the Beseler and I've seen ads for others.
At the other end of the scale are the technical cameras, the archetypal one being the Linhofs. I've never owned one but have played around with one and lusted after them. Marvelously constructed, bomb proof, the machined-by-German- elves-irresistable force-immovable-object feel. The design is focused on providing the most and it really is more accurately referred to as a technical, rather than press, camera. They are closer to flatbed designs than to the press design and are best thought of as flatbed designs with hand-hold-ability. An advantage over the Graphics design are the useful movements on the back. The back can extend back on four studs and you can adjust the length of these studs to get tilt and swing on the back. For more information on the Linhofs, see here. Not very wide angle friendly, especially the earlier models, but very solidly constructed and rugged.
Of course, two such wonderful designs provided grounds for a lot of hysteria around 'Linhofs are the ultimate' and 'the Graflexes are as good'. Click here for a less hysterical comparison.
I'd used a Super Graphic and had grown quite fond of it. I was spoilt from the monorail I'd grown up on but the lack of movements (in comparison) on the Graphic was seldom an issue for field work. The lack of back movements called for a certain style of visualization wherein you started with establishing the exact position and orientation of the back and then used the front movements to establish the required optical relationships. True, it wasn't as convenient to shoot old houses or barns, and macro work sometimes made me yearn for my old monorail but the trade off considerations on a field kit can be quite extreme. It was definitely a lot easier to cart the Graphic around - I was no longer tethered to the car. It folded up neatly and I did less damage to my camera when I was wielding it at the end of my tripod. I missed the back movements when I was doing macro work but engineered a kludge around it by mounting the camera onto a macro focussing rail which provided me with the equivalent of back shifts and rear focusing.
And then I had the opportunity to pick up a Meridian. I'd heard of Meridians as a dim echo from a bygone age. I'd even read some stuff about the Meridian 45A. Enough to make it sound very appealing.
Much cajoling and hand wringing later, I ended up with the Meridian 45B.
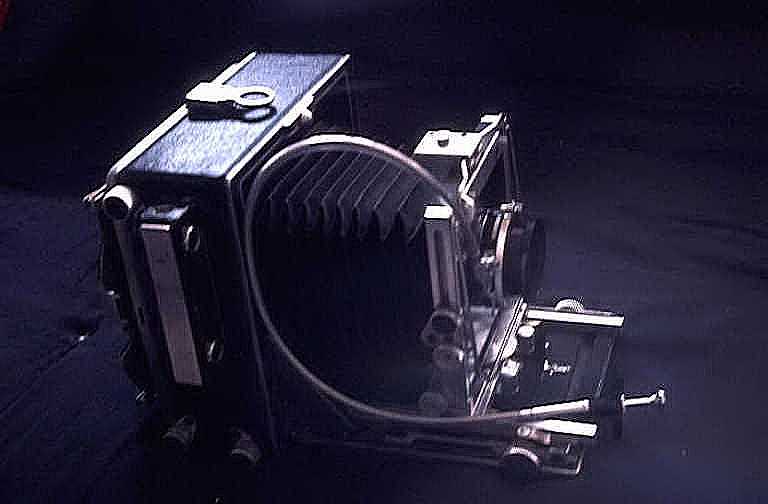
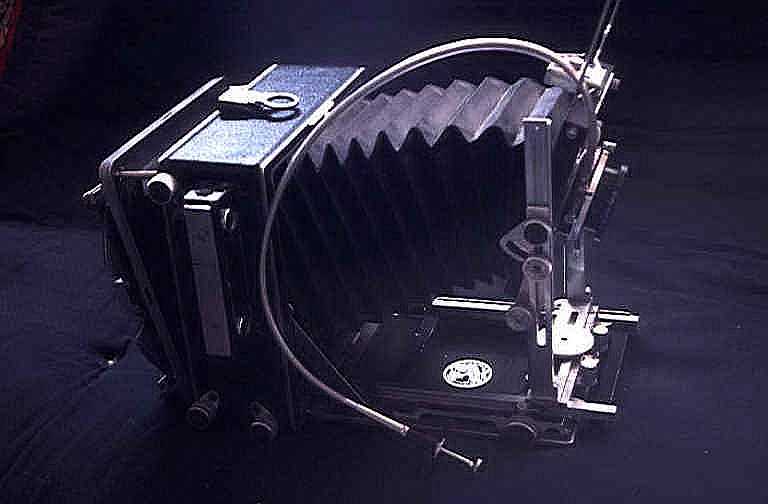
This is a very nicely engineered camera. A causal glance would make it seem as though not enough attention was given to minor details (a little more boxy than the Super) but using it revises that notion. It's a fairly solid box, made of cast aluminium with a black leather trim. Perhaps not as inspiring in its bomb-proof-ness as a Linhof but its quite rugged, everything looks and feels firm and solid. I haven't weighed it but I'd guess that it is less than 5 lbs. Folded up, its pretty compact, no bigger than the Graphics and fits conveniently into my pack.

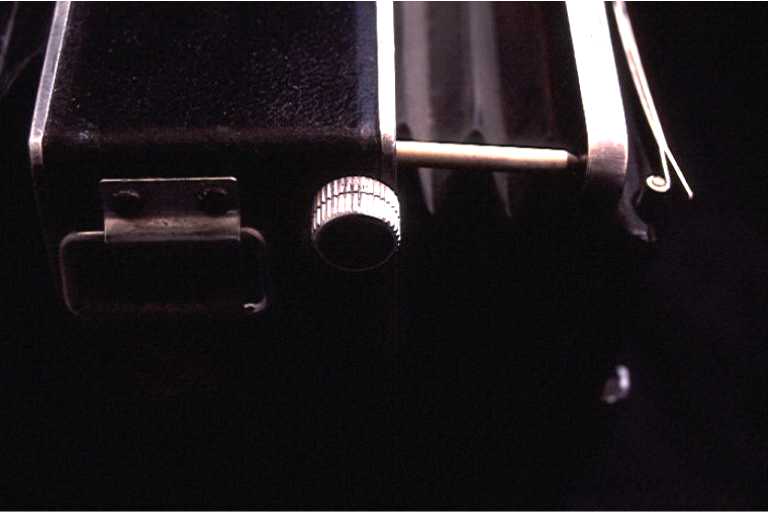
A small catch near the top releases the front that folds open and becomes the bed. The front standard is inside the body of the camera. By holding the two knobs at the bottom of the front standard and pressing them together, you can draw the front standard out and onto the focussing rails located on the bed. You should feel the front standard locking into place at one point on the bed and merely pressing the two levers together won't move it beyond. I spent quite some time trying to figure out why the front standard seemed to lock up at one point whereas pressing the two levers allowed the front standard to be moved freely over the rest of the bed. It's quite a clever little design. On the left side of the bed, there's a tiny notch in the rails. There is also a small lever beneath the front standard which ends in a tiny knob between the two large knobs you press together. This tiny lever is hinged and actually locks into the notch at this point. Yup, it's an infinity stop. Pressing the tiny knob between the large knobs releases the lever from the notch and now you can pull the standard forward as usual. I believe the earliest Linhofs had a similar system. A purist might feel less inclined to file notches into the camera bed but then I prefer ground glass focusing anyway and don't use the distance scales - so I didn't need to file more notches in and it merely provided an interesting design feature. For what its worth, there appears to be provision for multiple distance scales, two on the left hand rails and one on the right to help with different lenses.
I prefer the front standard lock on the Meridian over the one on the Super Graphic. My Super Graphic had a lever lock which would loosen over repeated lockings-and-unlockings, which meant every so often, I would have to tighten the lock nut below the standard. Minor irritant (and it might have just been the piece I had) but I prefer the positive spring lock the Meridian front standard has. Also, once locked down, it seems less inclined to move.
The front standard of the Meridian has all the movements you could ask for.
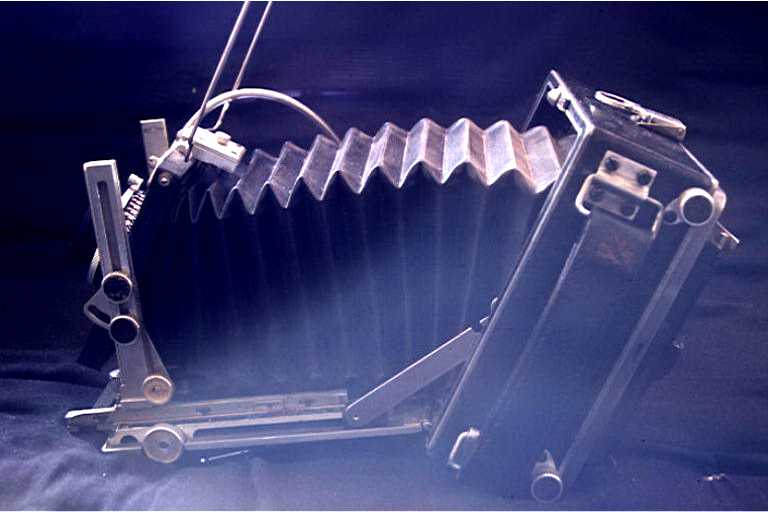
The front standard tilts forward by about 25 degrees and back by about 30 degrees. Why that odd figure for the backward tilt? The backward tilt exactly corresponds to the drop bed so that when the bed is dropped and the front standard fully tilted back, your standards are still parallel. The tilts are held in place with two locking nuts on the side of the standard. There is a zero detent, which can be heard and felt as it clicks into place. Loosening the other two locking nuts now allows you to use the geared rise adjustment. Fall works like the Graphics. You drop the bed and re-adjust with backward tilt and rise of the front standard. The bed drop also gives you additional tilt, should you so desire.
At the bottom of the front standard is a large wheel. Turning this wheel loosens the front standard, which can now be shifted to the right or left by a good couple of inches. The shift does not have a zero detent but there are two sets of lines which can be aligned for the zero position.
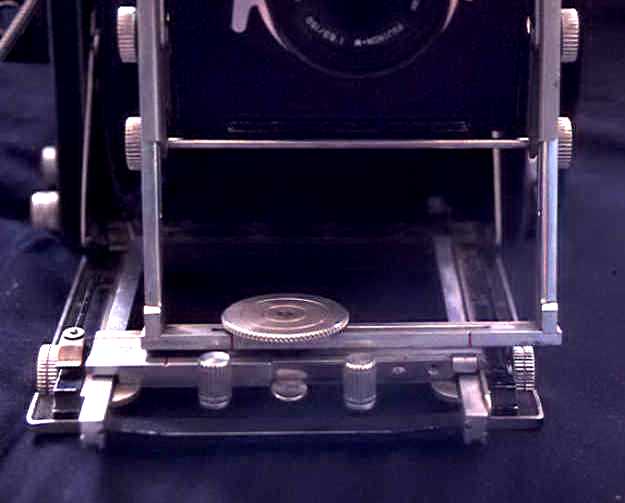
It took me a while to figure out the swing movements. It's the same wheel used to get shift. Loosening it a little further allows you to swing the front standard. The front standard sits in a stepped housing. A half turn of the wheels frees the standard to slide sideways in the housing for shift. A turn and a half allows it to climb the little step and swing. Technically, I suppose this adds a minor amount of rise (maybe a quarter mm). I can live with it. I prefer the fact that I can set shift without altering swing (something I worried about with my Super Graphic). Obviously, extremely tiny swings can get messy with the standard dropping back into the step but this appears to be a common malady with most detent systems. In any case, very minor swings are perhaps better done on the rear while watching the ground glass.
The technical back is quite nicely done. Very similar to the Linhof. Four screws at the top and bottom on either side secure the back to the body. Once these screws are loosened, the back slides away from the body on four studs and you can slide the back away from the body by about an inch and a half. By pulling out only one side, you can thus get about 15 degrees or so of tilt or swing on the back (obviously if you use tilt and swing simultaneously, the figures are a bit smaller). Pulling it all the way back gets you a longer bellows extension. Its also quite useful for fine tuning focus in macro work but not as precise as a geared back focus, so maybe the macro rail still has a place in my bag.
I was a little worried on this count since a review of the Meridian 45A had indicated that it took round lensboards designed to bayonet into place. While it probably is a very quick and efficient way to change lenses, I didn't relish the prospect of going searching for a machinist for each lensboard I needed. I was relieved to find the Meridian 45B has standard 4x4 lensboards. Pretty straightforward to change. You loosen two screws on top of the front standard and slide the slider across and remove the lensboard. To put it back, drop it into the notch at the bottom of the front standard, push it into place, slide the slider back and tighten the screws.
The back is a revolving back. My only grouse is that it doesn't have enough clearance for a grafmatic. It is not a graflok back and thus you can't remove the ground glass assembly either to try and use roll film holders or the grafmatic. The review of the Meridian 45A had indicated that the horns on the back prevent some rollfilm holder from being used on the Meridians. That problem probably remains. However, the Calumet C2 type thin roll film holders with the spools on the same side should work, though I haven't actually tried this. The design is quite transparent and I think if you felt the need, you could even tear into the back and replace it with a Graflok back and use longer studs to increase the amounts of tilts and swings on the rear. However, I have neither the need nor the desire to tear into a venerable classic. Obviously, regular cut film holders work fine, as do Quickloads. It seems like a fairly straightforward and non-surgical task to increase the clearance so that it could take a grafmatic. All that seems necessary is to increase the clearance on the curved spring. Probably will get around to that some day. (I did get around to it. I toyed with making a new longer spring with greater clearance but didn't relish the prospect of working on spring steel. Eventually, I settled on a much simpler solution - simple spacers between the springs and the back. I used nuts and washers and got sufficient clearance to use my grafmatics.)
The revolving back works fine. There is an audible click stop at all four 90 degree stops. However, unlike the Graphics there is no spring set catch to release before you rotate the back. The back has never actually shifted - it is, in fact, quite stiff and needs very directional pressure to turn and like I said, it clicks into place - but I think a design with a transparent lock at these points is probably preferable. But then there is no little spring catch to lose.
A final point about the back. It has a little spring lever, whose purpose I am unable to figure out. I've sort of concluded that its probably to hold the darkcloth i.e., you put a fold of the darkcloth under it so that it holds the darkcloth in place. Is this true? Anyone? (My error was pointed out to me. This is not meant to hold your darkcloth. It's a spring clip to hold a focusing hood in place - my camera came without a focusing hood. Goes to show that there is nothing quite as dangerous as a curious ignorant!)
The bellows extension is about 350mm, which is a fair bit for a field. It takes my 15" Wollensak tele with ease. The bellows are quite supple and allows a fair bit of movement in use even with fairly short lenses. They certainly seem nicer and more flexible than the bellows on my monorail (admittedly old and ragged) or on the Super (also looked like it had been ridden long and hard). The bellows are certainly longer than the Graphics. On the short end, they are quite supple and allow movements with my 90mm with no sign of binding. Movements at the short end are limited less by the bellows and more by mechanical features and dexterity (the standard is quite close to the box and its difficult to get at the front standard controls - another reason to be grateful for the back movements). I merely mention this to point out that the bellows do not limit movements with wide lenses and not to give the impression that the camera is not wide angle friendly. In some ways, it's probably the most wide friendly design (see below).
So how does it perform? Very well, thank you.
The long bellows allow you a fair bit of freedom with focal lengths at the long end. One of the nicest features is a focusing rail inside the body of the camera. So you can push the front standard into the body, and still focus since the standard is still on a focussing track. This feature alone probably makes this the most wide angle friendly press/technical camera I've seen. It probably handily outdoes even a Super Graphic in this regard. I estimate that it should be able to handle even a 45mm (whether you can manage movements is another question, what with the standard inaccessible inside a box and the extremely small distance between front and back). This is probably another reason for the steep bed drop since you definitely want the bed out of the picture area when you're shooting verticals with very wide angle lenses. There is another reason the internal focusing track makes for a particularly wide-angle friendly design. With designs that lack an internal rail, verticals with even a 90mm will put the bed into the picture. This means you have to drop the bed, which normally increases the bellows extension. Then you need to tilt the front standard back and use front rise. With the internal focusing track, you keep the front standard on the internal track and just drop the bed to get it out of the picture. As long as you're not focusing too close, it works fine. I was able to focus a 90mm quite close (to within a few feet) with the internal rail (and if really pushed to focus even closer, you can always use the bellows extension at the back).
The camera is fairly quick to set up and level. Mine didn't have bubble levels but these were relatively simple to add. Pop it onto the tripod (I keep a quick release on the body). Slide the catch open and pull the front standard out onto the rails and you're set to start composing.
The movements are more than ample for all but fairly extreme applications. The technical back is very nice and easy to use. Just have to remember to lock it down tight after you set it. The controls are by and large placed quite comfortably. Movements on the front are quite conveniently located and need only the two hands I have to offer (forward tilt on my Super Graphic always annoyed me slightly since I needed to hold down two clips, then tilt and focus and tighten lock nuts, needed quite a bit of manual dexterity or a third hand, preferably both). The controls, especially on the front, are a tad small and fussy, and makes operation with heavy gloves etc an exercise in patience and dexterity but this is something I'd pretty much resigned myself to with the smaller press/technical cameras.
My camera came with a side mounted Kalart rangefinder of somewhat dubious ability. Didn't bother me since I've always been partial to the ground glass. If necessary, I suppose it could be removed to save some weight or fixed/replaced.
My only grouse in use is caused by the back. I like to check for vignetting by sighting through the corners, especially as I use the barn door style shades for filter holders. I prefer the removable back since that allows a quick check through the corners. Since the Meridian does not have a removable back or a graflok, the only way out is to use a corner-less ground glass. That means assessing the corners can be difficult.
My camera didn't have the brightest ground glass (probably very old and seen quite some use), although it was perfectly adequate. Changing the ground glass etc is extremely simple. I replaced the ground glass with a Toyo corner-less ground glass. It's definitely brighter and easier to focus but has a fairly pronounced hot spot. I tried a Beattie on it and the image was definitely brighter and without a bad hot spot but the Beattie does not have cut corners and I'm somewhat fanatical about checking for vignetting. There was no accompanying fresnel, so presumably a fresnel or a Bosscreen might make image assessment easier - they are available in corner-less versions.
A nice unintended feature is the hoop viewfinder. Unlike the Graphics, where it folds down behind the back, the Meridian's folds forward and lies flat on the top of the body. This serves as a nice little clip for my dark cloth. I open the hoop viewfinder, push a button-hole on the dark cloth (which I cut and sewed into the dark cloth) through it and then fold it down again. I use the second clip on the side of the ground glass frame to hold the dark cloth in. (No longer. I made a focusing hood out of thin brass sheets and decorative hinges and the clip does the job it was designed to do.)
The sighting viewfinder frame folds down onto the front of the lensboard and you need to remember to swing it open. Its mildly annoying, since it gets in the way - if you don't fold it open, your cable release can get a little tangled in it which reminds you to swing it up and out of the way. I personally think the Graphic design (where it slides into the front standard and doesn't interfere (and can be pulled out when needed) was slicker but it's a minor irritant. One nice thing about the viewinder is that it is adjustable and can be slid forward or back to adjust for individual idiosyncracies in sighting through it. I believe it can be removed as well.
The Meridian folds up into a compact box. You can even leave a lens on when you close it (as long as it's not a large chunk of glass - I've left a 210 plasmat convertible on it and closed the box). Even a lazy soul like me is less inclined to keep the bellows exposed to thorns, shrubs and the elements when it is so easy to put them away out of harms way. Schlepping it is easy since it packs away quite neatly. Setting it up is quick and easy - just a few seconds to get it set and leveled.
All in all, the Meridian is an extremely interestingly designed camera. Makes you wonder why you don't see more of them around. At just a little more than a Graphic, it provides a very interesting bridge between the Graphics and Linhofs. In my opinion, the nicest trade-off of design elements I have seen.