
by Michael Mutmansky
© 2000
(DLC) and
Paul Barclay © 2001
(MQC)
for largeformatphotography.info
Introduction
The Canham DLC 45 camera has been a popular topic on discussion boards and the Internet for the last couple of years, and not without good reason. Since the camera is a unique design for a field camera, its' introduction has generated a great amount of debate about the merits of the DLC as compared to just about every other field camera on the market. One look at the archives for this site reflects that there have been numerous comments regarding the DLC.
See earlier comments on the DLC that have transpired on this site
This camera may be one of the fastest selling 4x5 field cameras in the US market right now. I talked with Jeff Wheeler from Quality Camera in Atlanta, Georgia, and he confirmed that he sells more of the DLC than any other camera, by a significant margin. Although Keith Canham won't release actual figures on the number of DLC cameras he's made in the past four years, the serial number on the camera is sequential, with a few exceptions. It appears that (as of August, 2000) there are over 500 Canham DLC owners out there. The sales of the DLC camera have slipped a bit since the introduction of the Canham MQC 5x7 camera, which is effectively a 'big brother' to the DLC. Jeff Wheeler stated that he believes the MQC 5x7 is a competitor for the DLC because the cost is not much higher, and the benefits of the 5x7 body (longer bellows, capable of accepting the soon-to-be-released 6x17 back) are difficult to ignore. I use my DLC for backpacking, so the use of the MQC with a reducing back is out of the question. Since these cameras are essentially identical in design with only performance specs to set them apart, this review is appropriate for both cameras.
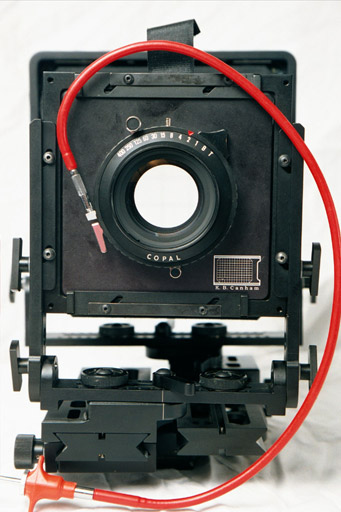
The camera is made primarily of black anodized aluminum, with brass gear rails and some small steel bolts and set screws. The camera is not cast, but is machined out of high quality aluminum stock material. This results in a very high quality finish surface, and equally high strength in each individual piece of material. This allows the weight of the camera to be reduced by removing material in places where the strength of solid aluminum is excessive to the use of the camera. There are holes and slots machined in many places for weight savings. The sides of the rear standard are drilled. However, rather than making this look like a stripped and chopped street racer, the weight savings have been done in an aesthetically pleasing way. One look at the baseplate of the camera and you know that the designer of the camera cared about how the camera looks as much as how it functions.
Overview
The DLC has several features that make it unique in the industry. First is the bellows design and materials. The standard bellows will accommodate any normal lens from a 58mm through a 450mm, and will also accommodate the Nikon 720mm T lens.
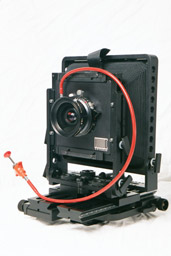
Left: DLC with 75mm, focused at infinity.
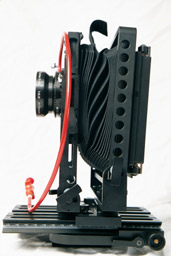
Right: DLC with 450mm, focused at infinity.
The bellows material is a very pliable and thin fabric that does not appear to be coated with bulky plastic or rubberized material. This results in a bellows that will compress easily and also deform to accommodate a short lens shift. Sometimes there is no substitute for a bag bellows, however, so the DLC has an interchangeable bellows. The retail price for the bag bellows is $350.
All experienced field shooters are very familiar with the machinations required to use a 75mm or shorter lens on a field camera. Recessed lens boards, dropped beds, indirect movements, and carrying a bag bellows are all in the bag of tricks for the traditional field camera user. The DLC has made all of these measures unnecessary for all but the most demanding wide-angle work. Architectural interior photography is the one field application where a bag bellows may be required with this camera.
I have found that I run into only two problems using the DLC with the normal bellows. The first is that the bellows gets tight with very short lenses, and there may not be enough room for the bellows to give you all the displacement you may want. The second is that the bellows will push against the front and rear standards when there is more than a minimal amount of lens displacement is used. This pressure results in a situation where the standards are not parallel, and it can be impossible to get the standards back to parallel. It can also be difficult to adjust the lens tilt because the bellows will push the front standard forward as you loosen the tilt locks.
Note that with a 75mm lens, the bellows can
interfere with rise, and push on the standards.
These shortcomings are inherent to the use of a pleated bellows with a short lens. The DLC, however, has pushed the envelope to the point where normal field shooting won't require a bellows change. Many traditional field cameras require a bag bellows or a recessed lens board for lenses 90mm or shorter. I regularly use a 75mm lens and have yet to have the bellows interfere such that I could not take a picture. I don't use the Schneider Super Angulon 72mm XL, so a user of that lens may find it has enough coverage for the bellows to interfere.
There was some concern when the new bellows material was introduced regarding how well the bellows will hold up to use. It was thought that the relatively thin material might be more susceptible to damage due to surface abrasion or puncture. To my knowledge, there have not been any problems of this type, although the camera is still fairly new. The real measure of the bellows material will come when there are 20-year old DLC's out there. At that point, if a used DLC with a good condition original bellows is not unusual, then the concerns were unfounded.
I was discussing the bellows material with Keith Canham at the Photo Expo East 2000 show in New York City recently, and he relayed an interesting story that some people who follow the internet discussion groups may have heard about. A photographer was setting up a shot during a trip to India when the camera fell off the tripod, rolled down an embankment, and into a river. Luckily, the camera had a lens on the front, so the camera floated, because of the air inside the bellows. The photographer jumped in after the camera and retrieved it. It was sent back to Keith Canham for repairs, which were done in time for the camera to be returned to the photographer at the Photo Expo Show. Keith told me the bellows came back to him in a wadded mess, so he threw them into a washing machine to clean them, and then had to reglue a portion of one of the frames back onto the bellows, but that the bellows were still useable and light tight. He had taken the bellows out of the washing machine and folded it back into the original pleating, and then clamped it so it would correctly pleat in the future. He told me that he was going to let the photographer choose if he wanted to purchase a new bellows, or keep the original bellows. The original bellows looked abused and has clearly seen better days, but that fact that it was useable at all is impressive.
Don't try this at home, I will not be held responsible for anyone who puts their bellows through a washing machine. But, if you do take a dunk in the field, clean out the camera well, remove the bellows and clean it as best you can, and fold it up properly and clamp it in a couple of rubber bands. When you get home, call Keith and get the camera to him for a thorough checkup. This may save you the expense of a new bellows.
The lensboards are sized to be compatible with the Toyo field camera boards (110mm). The Canham boards are slightly thicker than the Toyo boards, which may cause some compatibility issues if you use a Canham lensboard on a Toyo camera. The camera is also available as a special order with a front standard that is sized to fit the Linhof style boards. I think this is only worthwhile when you have other cameras that use this format, and you do not wish to change lensboards.
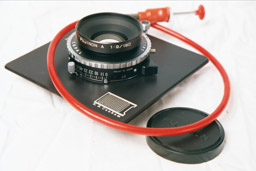
Canham lensboard with Fujinon 180mm f 9.0 A
in a Copal 0 shutter.
The Canham boards are less expensive than the Toyo boards, and unlike the Toyo, are machined out of high-grade aluminum stock. They are anodized rather than painted for a more durable finish. Do they need to be so well made? No, but it would be inconsistent to put a cheaply made lensboard on so well a made camera. If you want a lower-grade lens board, you can buy (and pay more for) the Toyo boards.
Canham does not make a recessed lens board for the reasons stated in the bellows section; the camera just doesn't need one to work well with short lenses. A recessed lens board might make using a very short (65mm and shorter) lens easier to use by giving the bellows a bit more room. I consider the inconvenience of a recessed lens board to far outweigh the potential benefits. The Toyo recessed lensboards will fit the DLC, so this option is available for anyone who prefers the recessed lensboard route.
Specifications for DLC45 and MQC57
Specifications for DLC45
Front Movements
Camera Set Up
I use a ball head with an Arca Swiss style quick release mechanism. So, I have a small A-S mounting plated bolted to the bottom of the camera. There is both a 3/8" and a 1/4" threaded hole on the bottom of the camera, so a Kirk mounting plate can be used that permits screws to be fastened into both holes. This makes the mounting plate permanent and solid, without any chance for the camera to rotate on the plate.
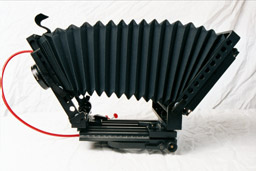
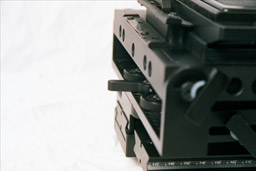
Set up the tripod, and slide the camera onto the head. Once secured to the tripod, loosen the rear standard and rotate it up into vertical position. There are very mild detents to assist in this procedure. Tighten the T-bar knobs to set the rear standard. Loosen the front rail and turn the front focus knob to extend it a small amount, so that the front standard is free to flip up into its' vertical position. Detents assist on this standard also. While the front standard rails are being flipped up, the front standard is rotated from facing down to facing out. This procedure is very similar to the traditional wooden field camera assembly procedure.
DLC with rear standard up, and front standard
partially unfolded
Leave the front focus mechanism loose, as well as the front standard T-bars knobs. Once the front standard is up, there are two small alignment tabs that slide into grooves in the front standard arms, which aligns the standard to the arms. The standard is then set to the proper height by aligning two marks on the front and two T-bar knobs lock the assembly tight. Finally, the two T-bar knobs that control the front tilt are tightened down.
At this point, the front and rear swing and shift mechanisms can be checked and zeroed if required. More discussion will follow on this below. The camera is then ready to accept a lens and be set for the first composition.
The bellows draw determines how the camera is focused, although there is a great deal of flexibility built into the system. If the leans is short (approximately 150mm and shorter) and focused at or near infinity, the standards will need to be closer together than they are when the camera is first set up. The standards can be loosened by a quarter-turn knob so that they slide in a track on each focus rail. This will allow the standards to be brought closer together, and is generally set by approximation based on the focal length of the lens selected. There are centimeter scales on each focus rail to assist, but with use, the proper distance will be set by 'feel' rather than any precise method. After rough focus, the final focusing can be done using the geared focus knobs, while working through the ground glass.
When using lenses that require more extension than the camera offers when initally unfolded (approximately 210mm and longer), the geared focus rails can be extended to the approximate distance by loosening the quarter-turn knob and turning the focus knob. Generally, the rough-focus sliders are not required in this situation.
Making Images
The gridded ground glass and Fresnel screen are standard on the camera, and I feel the brightness of the screen is sufficient for the lenses I use. I don't own any high-speed lenses, so the brightness of the focus screen is an issue, especially in low light situations. I do feel that the Fresnel screen is a necessity, and so does Canham, because the DLC is now only available with the Fresnel screen; it was an accessory when the camera was first released.
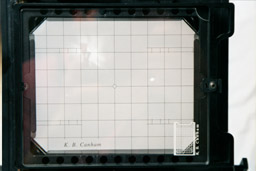
DLC ground glass with grid lines.
Note that lexan GG protector is in place.
Most of my lenses have been selected by size and weight, rather than image circle because of the type of photography I do. I shoot from a car at times, but I am often a great distance from my vehicle, so bulk and weight are important issues to me.
I find the DLC camera is very well suited for lenses from 90mm through about 300mm. Shorter than that, the two standards are very close together, which makes composing and focusing a little more difficult. Longer than 300mm, the camera becomes 'stretched out', less stable and more prone to vibration.
I regularly use a 450mm Fujinon C lens on the camera, and I have found that my images are not as consistently sharp with that setup. I am working on a method to 'lock down' the camera using a Bogen Long Lens Support arm, which I feel will completely eliminate all the sharpness issues associated with having the camera stretched out so far. At this focal length, the photographer must make sure the bellows is not sagging in the middle, which can cause the bellows to vignette on one side of the image (the top, but the bottom on the film). This is especially true when a vertical image is being shot. I have gotten into the habit of slipping my spotmeter under the bellows and onto the bed of the camera. The meter is just about the right dimension to eliminate the bellows sag. With lenses 300mm or shorter, the built-in Velcro bellows gather is normally sufficient to eliminate any bellows sag issues.
I especially like the ability to extend the camera both out the back and out the front. This permits the photographer to balance the camera on the tripod or make other adjustments of camera positioning with ease. To get the full extension available in the camera, both the front and rear extensions must be used. Even with the 450mm lens, both extensions are not fully extended, so there is still some room for balance adjustment.
I also feel that the ability of both standards to slide on their respective rails is very valuable. When a short lens is used, the front standard can be pulled back, or the rear standard pushed forward to achieve the proper focus. This feature is what eliminates the need for a drop bed with wide-angle lenses.
Finally, for close up work, the ability of the camera to focus using both the front standard and the rear will permit the photographer to compose and worry about magnification first, and then focus the rear to achieve critical sharpness without affecting the size of the subject on the ground glass.
General Impressions
Here is a list of additional comments on the design of the camera that are worth considering:
Likes
Dislikes
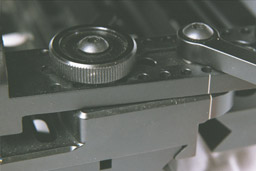
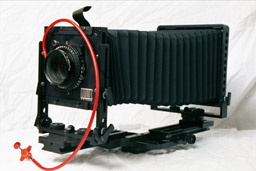
Left: Exaggerated example of unintentional swing.
Right: Use your index finger to check for swing from the rear,
or visually check for swing.
Note that the swing lever sticks almost directly out when locked down.
Specific Notes on Use
Cambo viewing accessories are said to fit the back of the camera. I purchased a Cambo folding viewing hood recently so that I can leave my focus hood at home when out backpacking. It didn't quite fit properly, but I was able to modify the frame on the hood to fit (thanks to a rotary tool, a high speed steel bit, the soft cast aluminum frame material, and a little ingenuity). If you don't have the tools, you won't be able to get the folding hood to fit. I make this statement assuming it wasn't a manufacturing defect in the Cambo hood that was the source of the problem.
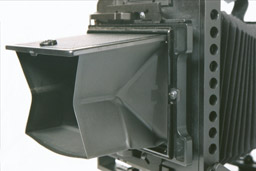
Cambo folding hood mounted on DLC
The bag bellows should be used for short lenses for architectural photography, although I don't recommend this camera for that use. A monorail camera is much better suited for that application in my opinion. The camera is not designed so that there is a high level of precision in the setup of the standards. It is certainly possible to use this camera for architectural photographs, but if your primary emphasis is architectural, I would consider an Arca Swiss or Sinar monorail as a more appropriate choice.
Some people have commented that the spring mechanism on the rear of the camera is strong, and that it can cause problems when loading a filmholder into the camera. The amount of effort required to pull back the focus screen frame and slide in a filmholder can cause the camera to move, especially if the tripod head is not locked down completely. I would prefer to have a bail arm on the back of the camera to facilitate the insertion of filmholders; my Phillips 8x10 Explorer has spoiled me in that respect.
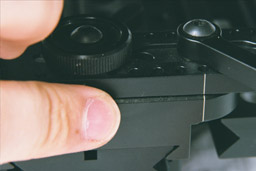
I have figured out that the best way to pull the focus screen frame is to use your left thumb and index finger to push on the rear standard (with the thumb) and pull on the focus screen frame (with your index finger) at the same time. This will create an 'equal and opposite forces' condition at the back of the camera, which will minimize the force applied to any of the joints on the camera or tripod.
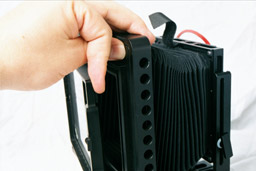
Method to pull back the ground glass.
Note location of thumb and index fingers.
Conclusion
The DLC is designed first and foremost as a field camera, and it should be measured and compared with other cameras in that context. While it can't compete with a fully geared, yaw-free monorail for precision, stability and luxury, it does stand up in the field camera crowd as a significant and worthwhile option.
Is this the best field camera available today? No, there is no 'best' camera. Every user will find their own mix of features and method of operation that will suit their own style. I, for one, occasionally long for the silky smooth movements of a Linhof. The Canham 45DLC camera, with its' combination of low weight, portability, and extensive capabilities make it a very popular camera for field shooters around the world.
This review is about the Canham MQC57 5x7 metal field camera, though due to design similarities, many of these comments will also apply to the 4x5 version as well. My camera is equipped with the Linhof/Wista lens board adapter and 4x5 reducing back, so I will include comments about these as well. I have used my camera for a little over two years and have been learning a lot about how to use it and overcome its quirks and deficiencies. The first thing anyone considering this camera should know is that while it is fairly easy for the experienced large format user to adapt to using, it is very demanding of your technique in order to obtain results that you will be happy with. Because of this demand on technique, this can be a very frustrating camera for the new user, regardless of previous large format experience. A big reason for this frustration is the lack of a users guide, so technique must be developed through use and experimentation.
As Michael Mutmansky noted above, the camera is intended to be stored with most of the locks loose, only to be tightened after set up. It is very easy to forget to tighten something, and have it shift during the insertion of the film holder, or under tension from the bellows. So making sure everything is tight is important. Beyond making sure everything is tight, there are other technique issues that must be learned in order to get good results from this camera. I have included many of the special techniques that I have been taught or developed below, so new users will have the advantage of this experience. In addition to this, there are a few things that need to be replaced before the camera will work the way you will intend. Most of these items are not that costly if you know about them in advance, and some can be ordered with the camera so you can avoid duplicating parts. These items are listed below in the camera body issues I have found.
Camera set up is identical to the method that Michael has stated for the 4x5 camera, so I will not repeat his description. When you set up the camera you will notice that is fairly large. Looking at the rear standard there are two sets of slide locks, two at the top and bottom edges of the frame and two closer to the center. The outer two locks are for shifting the rear face from vertical orientation to horizontal, as you probably expected. The second set are to hold the 4x5 reducing back, or the new 6x17 roll film back, in place once the 5x7 ground glass is removed. Removing the 5x7 ground glass holder is performed just like you would expect to remove a 4x5 holder. The two spring arms on each side of the holder are depressed and the hooks moved to the side until they are free of the camera, then the holder will lift out. The 4x5 reducing back is then put in place and secured by moving the two central slide locks in place just like a roll film back would be on a 4x5 camera. Once the reducing back is in place you will notice that is sits back from the rear face of the camera. This is necessary to make room for the slide locks, and insertion of a Polaroid film holder. So, if you desire to shoot a scene with both 5x7 and 4x5 film, refocusing after the back is changed will be required. Both ground glass holders come with Lexan covers, the 5x7 is "U" shaped so both the inner and outer surfaces are covered, the 4x5 is a single sheet that only covers the outside.
One thing that came up for me was where do I keep the reducing back, or the 5x7 ground glass, when the other is installed. The reducing back is delivered in a zip lock bag, while the camera comes in a nice nylon bag that is similar to the bag the 4x5 camera has. While I could slip either of the parts into a corner of my camera bag. I wanted something that would be padded because I knew my bag was not the right size for this larger camera and I would need something different. Fortunately my dealer had a small padded nylon binocular case made by Gara Gear that both parts fit in nicely. The case has belt loops on the back so it can be carried on the belt, or a strap can be used to place the case on your tripod.
For photographers that like using wide angle lenses this camera is a dream come true, as the standards can be positioned against each other without the requirement of changing the bellows or tilting the front standard. Though, positioning the standards close enough to use a wide-angle lens can be difficult, since the front standard interferes with the operation of the rear standard lock when the standards are close together. Fortunately once you learn the proper technique, placing the standards close enough for wide-angle work is quite easy.
To set the standards for a wide-angle lens, do the following: First, move the front standard, all the way forward and lock it in place. Second, move the rear standard forward until it is at least 1/4 of the way from the forward end of the rails, and lock it in place. Now, loosen the front standard and move it back to where you want it relative to the rear standard and lock it in place. Using this sequence will give your fingers plenty of room to manipulate the standard locks. Placing the standards forward is preferable, since most lenses 90mm and wider will include the focusing rails in the image area if the standards are far enough back.
Another plus for the wide angle photographer is the bellows, which is nicely pliable and does not seem to put too much stress into the camera when wide- angle lenses are used for 5x7 film. This is not quite true when the 4x5 reducing back is used, since more compression is required to get the lens in the proper place for the film. As an example of how pliable the bellows is, if the standards are touching, it might be possible to use a 65mm lens on a flat board with 4x5, though the bellows will probably not allow any movements other than tilt. I use a Schneider 72mm XL lens on a flat board, and small movements (rise and shift) are possible on 4x5 before the bellows interferes with the lens. On 5x7 a bit more movement is possible with the 72mm lens, but the bellows will still interfere with the lens unless you pull it out of the way. For my uses a 90mm lens on a flat board is okay on 4x5, but the 72mm lens is a bit cramped. With 5x7 film the 72mm lens is comfortable to use within the limits of the bellows. Using a recessed board for wide-angle lenses will certainly improve the ability to use movements. I have had issues with the standards changing tilt angles after I have secured them in place from bellows strain, and while inserting or removing a film holder. The causes and solutions for this are below.
Camera Body Issues: In the past two years I have found a few issues with the camera body that need a parts change, or a change in technique, to correct. I have talked with Keith Canham about many of them, and have noted the subjects where his input has helped. My camera is one of the first cameras made so there may have been a few changes in the manufacturing process that corrects what I have found. So, if you have a Canham camera, or are interested in one, and have questions, do call Keith. He is easy to talk with, and I have found him to provide information and suggestions freely.
Poor Focus Accuracy: In practice there are two interrelated design issues that make it difficult to focus this camera accurately. The most serious of these issues is the design of the camera base. In the interest of making the camera lightweight, the base does not fully support the focusing rails at long extensions, such as when a long focal length lens is being used. With long extension the focus rails will droop, which allows the teeth in the focusing knob to separate from the teeth in the focus rail. This gives the camera a "notchy" feel during focusing, and affects the focus of the camera when the focus lock is applied, which grips the focus rail and brings it back into alignment with the base, this realignment causes the focus to creep slightly. Unfortunately a design, and manufacturing, change is needed to provide proper support for the focusing rail by extending the notch, that guides the inner face of the focusing rail, the full length of the base. In the interim there are two techniques that will compensate for this design deficiency. One is to place your free hand on the focusing rail at the opposite end from the standard being focused to counteract the droop. Another method, provided by Keith, is to maintain some pressure on the focusing rail with the focus lock. This method seems to work acceptably, though it does make focusing a little less smooth. Keith mentioned this and recommended lubricating the focus rail with a dry lubricant. Keith recommended "Dry Lube", which contains molybdenum disulfide, and is available through the McMaster Carr catalog. I am using "Molly Lube" which is also a dry molybdenum disulfide lubricant. Molly Lube is available in the hunting and shooting sections of well-stocked sporting goods stores, and is manufactured by Birchwood-Casey. Molly Lube is an aerosol product, which will get almost everywhere if you try to spray it on your camera. To use Molly lube spray a liberal amount into a small piece of cloth then rub this on the beveled surfaces of the focusing rail where it touches the base and focusing lock. Then wipe it all off with a clean cloth. The small amount that is left in the surface of the rail should be enough for quite a while. Using the Molly lubricant is a big improvement over the bare aluminum contact between rail and focus lock. If you do not want to cut up an old T-shirt, the best source of cloth for doing this is 2-inch square cotton cleaning patches that are also available in the hunting section of your sporting goods store.
The other reason for poor focus accuracy is the supplied Fresnel lens, or bright focusing screen. This combination does not accurately represent the film plane of the camera. So it induces you to focus slightly closer than you intend. This closer focus may be the result of creep from the focusing rail coming back into alignment with the base as the focus lock is applied, though I did not notice any change when I started supporting the rail when I focus. For landscape shots where the lens will be stopped down for maximum depth of field this may not be noticeable. But for images where close focus with limited depth of field is desired, this can be very aggravating. Marking the front face of the Fresnel and using a high powered loupe does not help. Another issue is the coarse texture used in the Fresnel lens, which makes critical focusing difficult. In the 4x5 reducing back I have solved this situation by using a BOSS Screen. In the 5x7 back I have switched to using a true ground glass from Canham, though at present I am still evaluating this, and I will add to this review later. At present I can only recommend using the BOSS screen, if your local climate will allow its use, and you can find one. At this writing 5x7 BOSS screens were not available. Other bright screens, such as the Beattie Brightscreen, may be worth investigating.
Camera Tilts Will Not Lock in Place: This has been noted in a few reviews posted on the web. The front and rear standards will move under moderate pressure. Typically this is the rear standard moving when a film holder in inserted, or removed; though I have had an occasion where it moved due to bellows pressure when using a very wide lens on 4x5. This is caused by small size of the "T-bolts" used to secure the standards and the delrin (plastic) washers used between the T-bolts and the standards. While the T-bolts seem small, they are adequately sized if the proper washers are used. The problem is the plastic washers. In order to secure the standards with the plastic washers installed, the T-bolts must be very tight. This causes the washers to compress, which loosens the grip on the standard. Over time the washers become crushed and will break apart. The solution is to replace the plastic washers with stainless steel, or solid composite, washers. I discussed this with Keith and he mentioned that he originally used brass washers on his cameras, but stopped and switched to the plastic, due to complaints that the anodized aluminum was wearing the brass and turning the camera parts yellow. It is good that Keith stopped using brass washers, since brass, aluminum and water (particularly saltwater from ocean spray, or sweat) makes a very corrosive combination, and pitting or cracks will probably result. I replaced the washers under all of the T-bolts on my camera, using a mixture of stainless steel and composite washers, since that is what was available at my local hardware store. Now the standards stay in place using what I consider normal force on the T- bolts. Composite washers are preferable to stainless steel, even though they may break over time, since they hold better than the original plastic washers and should not wear away the anodize like stainless steel can. If you use stainless, recognize that most washers are stamped parts, so put the side with the smooth corners against the standards. This will reduce, but possibly won’t eliminate, the anodize wear.
Shift Locks are Difficult to Adjust: This situation occurs when there is strain on the front or rear standard from the bellows. The first impression will be that the knob is either too tight to loosen, or that it is tight enough after shift has been applied. This impression is caused by the small size of the lock knobs, which makes getting a good grip difficult, and the size of the base supporting the standard. This usually occurs because the standard has tilted against the lock knob during shift, and the knob is trying to push against the weight of the bellows. The correction for this is in two parts. First, to make getting a grip on the knobs easier, I have wrapped small rubber bands around them. This provides a soft surface that is easy to grip, so a lot less force is needed to open or tighten the knob. The other part is to pay attention to your technique, and make sure to always support the standard being moved with your free hand until it is locked back in place. Otherwise the standard will flop around when you insert or remove a film holder, and it probably will not be where you want it when the film is exposed. I have mentioned using rubber bands to Keith, and suggested that using an o-ring might be a long-term fix to make the knobs easier to adjust.
Focus and Standard Position Lock Over-Travel: Over time, the focus locks, and the standard position locks, require more rotation to properly secure them in place. From looking at the side of the locks I have noticed that a plastic washer is used under the lock lever, so this is probably the same issue of as noted for the standard tilts. At present there is still enough travel to secure the focus, and standard, locks, so I am not in a rush to disassemble them and replace the washers. So this is something to be aware of. If you have this situation, and the locks do not secure the parts tight enough, I suggest you contact Keith.
4x5 Reducing Back: The 4x5 reducing back had several issues, aside from the ground glass, fortunately most of them are simple to adjust. First and foremost the spring arms were not tightened to the ground glass holder properly. This allowed enough side to side motion that the ground glass holder can catch on the slide lock bases along each side of the opening, when removing a thick film holder like a Polaroid or Grafmatic back. The slide lock base design and spring tension are not enough to overcome this, so the ground glass will remain out of position unless it is noticed and put back in its proper place. If this is not noticed quickly, the ground glass will be out of position, relative to the film plane, when you set up your next image, and you will be very disappointed with the results. The solution to this is to find the screws that secure the spring arms to the ground glass carrier, and tighten them until snug, then back them off about 1/4 to 1/2 turn. If these screws are too tight, inserting a film back will be difficult. When you adjust the screws you may notice that there are plastic washers around them, in this location the plastic washer is desirable, so I do not recommend changing them.
The slide locks along side the ground glass carrier have two problems as well. First the slide locks are stamped from aluminum sheet, this give the lock a sharp edge that makes securing a roll film back in place difficult. The solution to this has two parts; first, try adjusting the screws to see if this will allow the slide lock to move into place easily, the second is to smooth this corner with a very fine file or sandpaper. If you wear the anodize down to bare metal, cover it with model airplane paint. Hopefully by now, Keith has instructed the shop making this part to "Break" the corners to a larger radius, or added a bevel to the edge that will press against a film back so filing will not be necessary. The other problem is the screws securing the slide locks in place. I have had slide lock slip under the ground glass holder and hold it away from the camera body when a 4x5 holder is removed. It is difficult to adjust the screws so they will hold the slide out while a 4x5 holder is being inserted, or removed, but easy enough move when a roll back is desired. I mentioned this to Keith and he replied that this was corrected in manufacture sometime after my camera was made. The problem was fixed when the machine that makes the reducing back was updated, so now all of the screws for the slide locks are installed perpendicular to the beveled face of the lock, rather than the base of the back. For those of us with the earlier back, if you are having a problem, call Keith, he has a simple method for bending the slide locks so they will stay out of the way yet move freely.
Linhof / Wista Lens Board Adapter: Linhof and Wista lens boards will not always fit properly in the adapter. Some boards will bind on the opening and will not seat properly. This situation is really an issue with the lens boards themselves, and not the adapter. In actual size the Linhof front standard is larger than the Canham front standard. Since the Canham standard is similar to a Toyo, and the adapter fits inside the standard, the remaining opening is slightly smaller than the opening found in a Linhof or Wista camera. The reason we have an issue with how Linhof and Wista boards fit, is Linhof and Wista allow a very wide variation in the diameters of the raised ring on the back side of the lens boards, so some of these rings will not fit in the adapter easily. In many cases the solution is to lightly sand, with fine sandpaper, the outer corner of the raised ring until the ring will slip into the adapter. In extreme cases the ring will need to be trimmed by a machinist. I have found that if the board will snap in place with light pressure, the sandpaper smoothing works fine, otherwise the machinist is needed. Because of this need for trimming, unless you really need to swap lenses between two different cameras, you will be much better off converting to the Canham lens boards. Given the price differences between the adapter, Canham boards, and Linhof/Wista boards, the cost of converting boards will be much less than buying the adapter. Also, if you decide to sand, remember to remove your lens from the board first, and be sure to cover any exposed metal with flat black model airplane paint.
I have also had boards where the notches in the bottom edge of the board are too narrow to sit easily on the two posts on the adapter. Rocking the board forward and back several times usually allows the board to sit properly, and with enough repetitions the board will fit smoothly. Though I have had to file one board to get it to fit properly.
Bellows Jump: Bellows jump is when the rear bellows ring pops out of the rear standard when you remove the camera back to switch orientation from horizontal to vertical, or vice versa. This happens when the front and rear standards are close together, such as when a wide-angle lens is being used. This is caused by the design of the rear standard, which relies on tension in the bellows to hold the bellows ring in place. Usually this is not an issue if the bellows really jumps out of the rear standard since it is hard to miss, just remember to fit the bellows ring flush against the camera back and put it back in place. Where this can cause aggravation is when the bellows ring just slips out of place, and you do not notice it. In this situation light leaks are possible. There are two things that can be done to correct this situation, first be aware it can happen and make sure the bellows ring is properly seated in the rear standard and flush against the camera back, before securing the back in place. Second, if you don't like the possibility of the bellows jumping out at you, Keith has informed me that a small piece of double-sided tape between the bellows ring and its mating corner in the rear standard, works very well to hold the bellows in place.
Conclusions: At present I have mixed feelings about the camera, there are things I like, such as the ability to use very wide lenses. But it has been frustrating to use, since I like close focus with shallow depth of field. Because of this frustration, if this were strictly a 4x5 camera I would have traded it long ago, and would not have done the research needed to find and solve the issues noted above. When I originally got the camera I thought I would use 4x5 most of the time, with an occasional 5x7. But in practice I want to use 5x7 almost exclusively, which has given me the incentive to isolate what wasn't right with the camera. Now that I have corrected these issues, I find that I am concentrating the image, rather than the camera. Time and practice will tell how my opinion develops. I will update this review in the future with my long-term impressions and any solutions to getting accurate focus on 5x7.
If asked about this camera, what would I recommend? For photographers new to large format, this is probably not the camera to start with. The beginning large format photographer will find smaller, and simpler field cameras like the Toyo, or Wista, metal field cameras better suited to their needs. Experienced large format photographers that want to move up to 5x7 and want more versatility, will probably find this camera worthy, once the hardware issues are corrected, and their technique has developed. Hopefully Keith will correct the hardware issues when the camera is assembled, and will also write a user’s guide to provide the finer points of using this camera.
About K.B. Canham Cameras, Inc.
There was a good article about Keith Canham in View Camera Magazine (May/June 1998). It explains the background behind the company, and gives some insight into the quirky and interesting nature of the man. Keith's into old things; old cars, and old motorcycle, and old pianos. I think the craftsman style approach to his large format cameras comes from his experience with the past. He has worked on enough old equipment over the years to have a certain respect for the way things were made in the past.
His cameras are very much like the old pianos he used to restore. While the majority of the inside of a piano is purely utilitarian and never meant to be seen, there is often a certain beauty and grace to the way the old insturments were built. The craftsman tradition is about the desire to build something functional beautifully, just because it can be done that way.
K.B. Canham Cameras, Inc.
2038 East Downing
Mesa, Arizona 85213
480-964-8624
View earlier comments on the DLC
View or add new comments on the DLC and MQC